Thermoplastic polyurethane (TPU) wrap film has become the gold standard for modern paint protection, combining self-healing properties, strong impact resistance, and long-lasting optical clarity. This step-by-step installation guide walks you through how to install TPU wrap film like a professional, whether you are protecting a daily driver, a performance car, or a high-end SUV.
What Is TPU Wrap Film and Why Install It?
TPU wrap film is a clear, flexible paint protection film engineered from thermoplastic polyurethane. Unlike traditional vinyl wrap used mainly for color changes and graphics, TPU films are optimized for protection, not just style. High-quality TPU wrap films are typically thicker than PVC wraps, resist yellowing, and can self-heal light swirls when exposed to heat.
When installed correctly, TPU wrap film helps shield your factory paint from:
- Stone chips, sand, and high-speed road debris
- Light scratches and wash marring
- Oxidation and UV damage that dulls clear coat over time
- Bug splatter, bird droppings, and traffic film stains
The result is a deeper, glossier finish that stays cleaner for longer and helps preserve resale value. The key is a clean, controlled installation process with the right tools and environment.
Tools, Materials, and Workspace Setup
Before you touch the film, make sure your tools and environment are ready. Proper setup prevents most of the issues (fingers, silvering, lift marks, contamination) that frustrate beginners and even some intermediate installers.
Essential tools and materials
- TPU wrap film (pre-cut kit or bulk roll)
- Two spray bottles: one for slip solution, one for tack solution
- High-quality squeegee with soft or felt edge
- Heat gun or infrared lamp
- Microfiber towels and lint-free drying cloths
- Clay bar or synthetic clay mitt
- Isopropyl alcohol (IPA) for final wipe and tack solution
- Sharp knife with snapped, fresh blades
- Masking tape and panel markers (grease pencils)
Ideal installation environment
TPU wrap film installs best in a clean, enclosed space with stable temperature and humidity. A typical “sweet spot” for most paint protection films is around 20–28 °C (68–82 °F). That range keeps the film flexible and gives the adhesive predictable, controllable tack.
Avoid installing outside in direct sun, heavy wind, or dusty environments. If you must work in a less-than-ideal space, minimize airflow, keep the floor wet to trap dust, and use bright, diffused lighting to see edges, stretch, and trapped moisture clearly.
Surface Preparation: Clean Paint, Clean Install
Surface prep is where professional TPU installations are won or lost. Any contamination left on the paint will be trapped under the film and can cause long-term adhesion issues.
- Pre-wash the vehicle. Use a pH-neutral shampoo and thorough rinse to remove loose dirt, road salt, and traffic film. Pressure-wash wheel arches and lower panels carefully.
- Decontaminate the paint. Use iron remover on heavy fallout areas, then clay bar or a synthetic clay mitt to remove bonded contaminants such as overspray and tree sap.
- Degrease edges and high-impact zones. Mix isopropyl alcohol with distilled water (typically 1:1) and wipe panel edges, recesses, and chip-prone areas. Change towels frequently.
- Inspect under strong lighting. Use a high-CRI inspection light to confirm there is no remaining wax, polish residue, or dust. Correct any paint defects you care about now—PPF will not hide deep scratches or chips.
The goal is surgically clean paint. If you see anything on the surface now, you will see it even more clearly after the TPU wrap film goes on.
Mixing Slip and Tack Solutions
TPU wrap film is installed “wet” using two types of solutions: a low-friction slip solution to float and position the film, and a higher-tack solution to lock your anchor points and edges in place.
- Slip solution. Distilled water plus a small amount of neutral baby shampoo or dedicated PPF slip concentrate. You want the panel to feel slick, not foamy.
- Tack solution. Distilled water plus isopropyl alcohol, typically around a 1:5 to 1:1 ratio depending on film and climate. Always follow your film manufacturer’s technical data sheet.
Label your bottles clearly. During installation you will alternate between slip and tack, sometimes on the same panel, to achieve stretch, alignment, and clean, tight edges.
Step-by-Step: How to Install TPU Wrap Film
Below is a typical process for installing TPU wrap film on a hood, bumper, or fender. Complex panels (multi-piece bumpers, deeply recessed vents, large roofs) follow the same logic but demand more experience and planning.
Step 1: Plan your install and dry-fit the film
- Lay the film (with liner still on) over the panel to confirm coverage and grain direction. TPU wrap film often has a subtle directional sheen.
- Use masking tape to mark alignment points on the panel and film. On bulk installs, mark reference centers and key features (badges, washer nozzles, parking sensors).
Step 2: Flood the panel with slip solution
- Generously spray slip solution over the entire panel. You should see an even, continuous water film, not dry patches.
- Remove any stray hairs or dust you see at this point. Once the film is on the panel, contamination is harder to fix cleanly.
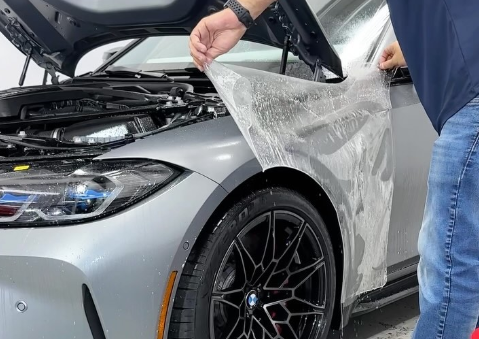
Step 3: Transfer and position the film
- With a helper holding the opposite side, peel the liner and keep the adhesive surface wet using slip solution as you move toward the car.
- Lay the film onto the wet panel, aligning the center and main reference points first. The film should be able to “float” on the slip solution so you can nudge it into position.
Step 4: Create anchor points with tack solution
- Once alignment is correct, gently lift a small area where you want your first anchor. Spray tack solution under that zone, then squeegee firmly in short, overlapping strokes.
- Repeat this on a few critical positions (for example, the hood center line and both upper corners). These anchors keep the film from drifting as you remove slip from the rest of the panel.
Step 5: Squeegee out slip, air, and tension
- Working from your anchors outward, use controlled, overlapping squeegee strokes to push slip solution and air toward the edges. Maintain even pressure; do not stab at the film.
- If you encounter “fingers” (small tented peaks) at edges, stop and reassess. Often you need to relax the film by warming it slightly and re-distributing stretch, rather than just forcing the fingers down.
Step 6: Form edges, curves, and recesses
- For tight curves and deep recesses, use a heat gun on low to medium setting to gently warm the TPU wrap film. It should become more malleable, not floppy or glossy.
- Add tack solution where you want edges to lock, then roll the film around the panel edge using the squeegee or your gloved thumb.
- Avoid overstretching. As a rule of thumb, keep total stretch within roughly 10–15% on most TPU PPFs; more than that can cause long-term tension, edge lift, or optical distortion.
Step 7: Final inspection and curing
- Under strong lighting, inspect the panel from multiple angles. Small microbubbles of clean water will usually evaporate during curing, but trapped dirt or large air pockets should be corrected immediately.
- If necessary, gently lift a local area, re-flood with slip, and re-squeegee. Work slowly to avoid stretching or creasing the film.
- Once satisfied, allow the film to cure. Most TPU paint protection films achieve initial bond in 24–48 hours and continue to cure for up to 1–2 weeks, depending on temperature and humidity. During this time, avoid high-pressure washing or harsh chemicals.
Clear and Matte TPU Options: Choosing the Right Finish
One of the advantages of modern TPU wrap film is the variety of finishes it offers. Traditional high-gloss films behave like an invisible clear coat and are ideal if you want highly reflective, show-car gloss. For this style, start by exploring premium clear ppf options designed for full-body or high-impact zone coverage.
If you prefer a stealth, satin look that mutes reflections and hides micro-swirls, consider a high-quality matte ppf wrap. Matte TPU films still provide rock-chip protection and self-healing properties, but transform the visual character of your car far more than clear films do.
For buyers focused purely on long-term paint protection more than color change, TPU-based tpu wrap products typically offer superior clarity, elasticity, and durability when compared with older PVC-based films.
Care, Maintenance, and When to Call a Professional
After installation, treat TPU wrap film as a sacrificial but valuable layer over your paint. Hand washing with pH-neutral shampoo, soft mitts, and clean drying towels will keep the surface clean and reduce swirls. Avoid aggressive cleaners, abrasive polishes, or harsh degreasers unless specifically approved for PPF.
For most owners, DIY installation of small panels (mirror caps, door cups, partial hoods) is very achievable. Large, complex panels, full-front kits, or full-body wraps are usually best left to experienced installers who work with TPU wrap film every day.
If you are planning a larger project or want to combine protection with a full body color change, you can also coordinate TPU PPF with a high-quality vinyl wrap design to balance aesthetics and long-term paint protection.